My Notes on Full-Stack
Table of Contents
- 1. Version Control
- 2. HTML Refresher
- 3. CSS Refresher
- 4. Tailwind CSS
- 5. Fundamentals of JavaScript
- 6. TypeScript
- 7. ExpressJS
- 8. React
- 9. Web Graphics
1. Version Control
1.1. Types
| Local | Centralized | Distributed |
|---|---|---|
| All versions Locally stored | Server stores all versions | Both server and client, stores all versions |
| Client stores current version | ||
| Eg. Perforce, Subversion | Eg. Git, Bazaar, Darcs | |
1.2. Branches
1.2.1. Creating New Branch
git checkout -b "new-branch"
1.2.2. Switching to a Branch Already Created
git checkout "main"
1.2.3. Merging
If you’re in main branch, and you want to include the changes of new-branch, you
do:
git merge new-branch
git push
2. HTML Refresher
2.1. Forms
This is how a general form looks like:
<form
  action="url"
  method= x
  target= t
>
  <label for="nameInput"> Name </label>
  <input type="text" name="nameInput" value="Name" />

  <input type="reset" name="reset" value="RESET" />
  <input type="button" name="clicky" value="CLICK" />
  <input type="submit" name="submit" value="SUBMIT" />

</form>
- x is
"get"or"post" - t is
"_blank"or"_top" You can’t use
<i>,<b>,<img>or any such tags with a button creating using<input>. For that you’ll have to use the<button>tag:<button onclick="alert('hey')" > Click me hard </button>
You can also use buttons as checkboxes:
<button
  type="checkbox"
  value="checkbox"
  checked
></button>
3. CSS Refresher
3.1. Box Model
- Your content is the inner-most box, and you have a border around it.
- The space between content and border is called padding.
- The space on the outside of the border is called margin.
- When you set height or width in CSS, you change the dimensions of only the content. The actual space the element occupies, contains content and padding only. The margin isn’t part of the box, as it’s just used as a seperator between elements.
If you want the height or width to be of the entire box, and not only the content, you use:
 * {
  box-sizing: border-box;
}
3.2. Flexbox
Flexbox is a layout system, where you can place items in a particular row, or a particular column. To use it, put this on the parent element:
display: flex;By doing this, the children go from left to right (this is the default value).
flex-direction sets the main axis:
Value Direction row left → right row-reverse right → left column top → bottom column-reverse bottom → top justify-content aligns items on the main axis:
Value Behavior flex-start Items bunch at the start flex-end Items bunch at the end center Items centered space-between Even space between items space-around Equal space around items space-evenly Equal space between and outside items align-items aligns items on the cross axis:
Value Meaning stretch (default) Items stretch to fill container height center Items align to center flex-start Items stick to top (or left, in column) flex-end Items stick to bottom (or right, in column) baseline Align text baselines
- gap is the flexbox way of margins.
- flex-grow is a property used by the child of a flex container. It’s the ratio of the size that child occupies. If all elements have flex-grow: 1; then they all share the same space. If one element has flex-grow: 2; that element would take twice the amount of space as compared to the rest.
- flex-shrink is a property used by the child, which tells if that item can shrink if the container is small (flex-shrink = 1;) or not (flex-shrink = 0;).
- flex-basis is a property used by the child which specifies the minimum/maximum width (or height depending on what the axis is) of the item before growing/shrinking.
To combine all 3 properties of the child:
.item {
  flex: 1 1 200px;
  /* grow shrink basis */
}
- align-self is a property used by the child and it overrides align-items used by the parent.
3.3. CSS Grid
Flexbox was for 1D. This is for 2D. Assume this HTML Code:
<div class="grid-container">
  <div class="box">1</div>
  <div class="box">2</div>
  <div class="box">3</div>
  <div class="box">4</div>
</div>
And here’s the CSS code
.grid-container {
  display: grid;
  grid-template-columns: 100px 200px; /* 1st column 100px wide, 2nd column 200px wide*/
  grid-template-rows: 100px 100px;    /* 1st column 100px wide, 2nd column 100px wide*/
  gap: 10px;
}

.box {
  background: lightblue;
  border: 1px solid black;
  display: flex;
  align-items: center;
  justify-content: center;
}
This makes a grid that looks like:
You can also use fractional units:
grid-template-columns: 200px 1fr 2fr;
/* 1fr means 1/3rd of the width of grid, and 2fr means 2/3rd */
3.4. Positioning
position is a property and here are the values possible:
position What it does static Default, no top, left, bottom or right relative Moves relative to its normal spot absolute Moves relative to nearest positioned ancestor fixed Stays fixed to the screen (e.g., navbars) sticky relative till a point, scrolling beyond which it becomes fixed - You can also move elements using top, left, bottom or right. Different
positions affect this movement though.
- When position: relative; and bottom: 10px; the element is moved 10px upwards, but the space it originally occupied is kept intact. The rest of the webpage behaves like it’s still in the old-spot.
- When position: absolute; and bottom: 10px; the element is moved 10px upward from the first ancestor having some position set.
- When position: fixed; and bottom: 10px; the element is placed 10px upward from the browser window, and it stays stuck there.
- When position: sticky; and top: 10px; the element is relative and keeps moving as it’s scrolling, but once it reached the top of the container, it sticks to the top (of the container). It remains visible until the container is visible. This is usually used with top, and not with bottom (you CAN though). One thing to note is that the container must be scrollable.
- So normally, people use relative positioning for a parent container, and absolute positioning for the child container. This would mean the child’s coordinate system is with respect to the parent.
- z-index is a property that holds a value. The higher the value, the more forward it is in z-axis.
3.5. CSS Variables
/* This is how you declare variables */
:root {                     /*  :root means global scope    */
  --main-color: #4caf50;    /*  --main-color is a variable  */
  --spacing: 16px;          /*  --spacing is a variable     */
}                           /*                              */

.button {
  background-color: var(--main-color);  /* this is how you use it */
  padding: var(--spacing);
}
3.6. Psuedoclasses
A psuedoclass is in the form element:psuedoClass, and using this, you can modify the css properties of an element when it’s in a particular state. For example:
a:hover {
  color: red;
}
input:focus {
  border-color: blue;
}
Here are some common pseudoclasses:
Selector When it applies :hover On mouse hover :focus When focused (e.g., text input) :first-child If it’s the first child of parent :last-child If it’s the last child :nth-child(n) Targets the n-th child :not(selector) Inverse selector (excludes) :checked Radio/checkbox when selected :disabled When form field is disabled The nth-child(n) selector also supports patterns:
li:nth-child(odd) selects 1st, 3rd, 5th… li:nth-child(even) selects 2nd, 4th, 6th… li:nth-child(3n) selects every 3rd item: 3, 6, 9… li:nth-child(2n+1) selects all odd items
3.7. Pseudo-elements
You can style certain parts of an element. For example:
h1::first-letter {
  font-size: 200%;
}
Here are some common psuedo-elements:
Selector What it does ::before Inserts content before the element ::after Inserts content after the element ::first-letter Styles the first letter ::selection Styles selected text
3.8. Media Queries
For dark-mode:
@media (prefers-color-scheme: dark) {
  body {
    background: #121212;
    color: white;
  }
}
For mobile screens:
@media (max-width: 600px) {
  .container {
    flex-direction: column;
  }
}
4. Tailwind CSS
Tailwind allows you to use a combination of predefined styles, together as the name of a HTML class. So the name of the class itself will contain all of the styles.
4.1. Margin and Padding
Tailwind gives you 97 different sizes for padding, each denoted by p-0, p-1, p-2, p-3, p-4 … p-96.
Tailwind Class Size in rem Size in px p-0 0rem 0px p-1 0.25rem 4px p-2 0.5rem 8px p-3 0.75rem 12px p-4 1rem 16px - It’s exactly the same for margin too, except that it’s denoted by m-0, m-1, m-2, …
You can limit the padding to different sides, by adding a letter to ’p’ or ’m’. For example, pt-4 means padding at the top is 16px.
Tailwind Class Normal CSS Code pt-4 padding-top: 16px; pb-4 padding-bottom: 16px; pl-4 padding-left: 16px; pr-4 padding-right: 16px; px-4 padding-left: 16px; padding-right: 16px; py-4 padding-top: 16px; padding-bottom: 16px;
4.2. Colors
- Colors are generally in the form entity-color-intensity, where:
- entity can be text for coloring text, or bg for coloring background.
- color can be any name like blue, green, red, gray, etc. Refer Tailwind Colors in Every Format - shadcn/ui.
- intensity can be any number between 100 and 900, and this is an optional parameter.
- For example, text-blue-900 makes text dark blue.
- You can also give a custom hex value by entity-[#hex]. For example text-[#0000ac]
4.3. Fonts
For sizing, the general format is text-size, where size is a given definition from Tailwind.
Tailwind Class Font in px text-xs 12px text-sm 14px text-base 16px (normal size) text-lg 18px text-xl 20px text-2xl 24px text-3xl 30px text-4xl 36px text-5xl 48px text-6xl 60px text-7xl 72px text-8xl 96px text-9xl 128px text-[15px] 15px (Anything) - You can use font-bold, font-medium, font-light for the weight of the font.
4.4. Layouts
4.4.1. Flexbox
To make a container a flexbox, use the class flex on it. After that, we specify the flex-direction: it’s flex-row or flex-col. Eg:
<div class="flex flex-col">
  <div>Top</div>
  <div>Bottom</div>
</div>
- For justify-content, you can use these values:
- items-center (vertically centres items)
- justify-center (horizontally centres items)
- justify-start
- justify-end
- justify-between
- justify-around
- items-start
- items-end
- items-stretch
For flex-grow of the children of the container, just use flex-1, flex-2, etc. Eg:
<div class="flex">
  <div class="flex-1 bg-red-200">Item 1</div>
  <div class="flex-1 bg-green-200">Item 2</div>
</div>
To space out children, use gap in the container:
<div class="flex gap-4">
  <div class="bg-blue-300 p-4">1</div>
  <div class="bg-green-300 p-4">2</div>
</div>
4.4.2. Grid
<div class="grid grid-cols-2"> <!-- grid-rows-2 for rows layout-->
  <div>Left</div>
  <div>Right</div>
</div>
4.4.3. Real-World Constructs
Here are a random bunch of other things you can do:
Topic Why It Exists flex , grid Arrange layout p-* , m-* Spacing gap-* Space between children hover: , etc Interactivity sm: , md: Responsive styles Here’s an example of a button that uses some of this:
<button className="bg-blue-500 hover:bg-blue-600 focus:ring active:scale-95">
  Click me
</button>
Here’s an actual implementation of a simple navbar
      <nav class="flex items-center justify-between p-4 bg-blue-600 text-white sticky top-0 z-10">
        <div class="text-xl font-bold">Logo</div>
        <ul class="flex gap-4">
          <li>
            <a href="#" class="hover:underline">
              Home
            </a>
          </li>
          <li>
            <a href="#" class="hover:underline">
              About
            </a>
          </li>
        </ul>
      </nav>
Aligning items:
Tailwind CSS Equivalent What It Means items-start align-items: flex-start Align top (if flex-direction is row) items-center align-items: center Align vertically center items-end align-items: flex-end Align bottom items-baseline align-items: baseline Align text baselines items-stretch align-items: stretch Stretch children to fill height
5. Fundamentals of JavaScript
5.1. Document Object Model
It’s a programming interface for web documents, that arranges all the elements of the web page, as the nodes of a tree. Scripts (JavaScript or TypeScript code) can create, access or modify these nodes, and don’t need to reload the entire page.
5.2. Variables
- var is global while let and const are limited to the scope of the block.
- const variables can’t be changed, while those of var and let can.
For Example:
var name = "john";
name = "JAAN"; // you can change var and let

const pi = 3.1428;
// pi = 4 -> No you can't do that

/* some block of code */ {
    let x = 9;
}
You can use var variables even before declaration. It’s value would be undefined if you try to reference it before declaration.
function sayHi() {
  console.log(name);  // output: undefined
  console.log(age);   // output: ReferenceError
  var name = 'Lydia';
  let age = 21;
}

sayHi();
- Keywords
newandtypeofare considered operators.
5.3. Unary Plus
This converts any primitive that’s not a string, into a number. For instance:
console.log(+"7");    // Outputs 7 and this 7 is a number
console.log(+true);   // Outputs 1
console.log(+"hey");  // Outputs NaN because there's no number that corresponds to "hey"
5.4. Template Literals
Template Literals are the Python f-strings of JavaScript:
const name = "Alice";
const greeting = `Hello, ${name}!`;
console.log(greeting);  // Output: Hello, Alice!
This is called Interpolation.
In general, using backticks preserve new line characters and what not. They’re much more powerful than single quotes or double quotes.
const message = `
  This is a multiline string.
  Each line here is preserved as-is.
`;
Integers in strings get typecasted to a
numberin case of subtraction, multiplication, division, subtraction, exponents, but remains a string in case of addition. This is because addition is for string concatenation.console.log(typeof ("5" - 2)); // output: number console.log(typeof ("5" + 2)); // output: string console.log("5" + 2); // output: 52 console.log(Number("5") + 2); // output: 7
- BigInt: Append n to the number if you need to work with integers that exceed the Number.MAXSAFEINTEGER limit (9007199254740991). BigInt is essential to avoid precision loss.
5.5. Date
There exists a
Date()function that returns a big string:console.log(Date()); // Output: Thu Aug 21 2025 21:53:43 GMT+0530 (India Standard Time)
For a much more narrowed-down information like the day of the week, or time, you’ll have to create a
Dateobject.console.log(new Date().getDate()); // returns number 1-31
console.log(new Date().getDay()); // returns a number 0-6
// 0: Sunday
// 1: Monday
// 2: Tuesday
// ...
// 6: Saturday
console.log(new Date().getNewYear()); // returns 2025
console.log(new Date().getTime()); // number of milliseconds since UNIX Epoch
// UNIX Epoch = January 1, 1970
There also exists getHours() (0-23), getMinutes() (0-59), getMonth() (0-11),
etc.
5.6. Functions
5.6.1. Normal Functions
<html>
  <body>
    <p id="random"></p>
    <script>
      function fillContent(){
           document.getElementById('random').innerHTML = "is 5 == '5'? Answer: " + (5=='5');
      }

      fillContent();
    </script>
  </body>
</html>
5.6.2. Arrow Functions
- The code below does the exact same thing as the code above. They’re just two different representations of the same thing.
<html>
  <body>
    <p id="random"></p>
    <script>
      const fillContent = () => {
           document.getElementById('random').innerHTML = "is 5 == '5'? Answer: " + (5=='5');
      }

      fillContent();

    </script>
  </body>
</html>
- Here’s another example:
<html>
  <body>
    <p id="random"></p>
    <script>
      const multiply = (a,b) => a*b;
      /*
      // The same as:
      function multiply(a,b){
          return a*b;
      }

      */

      multiply(5,2);
    </script>
  </body>
</html>
- The arrow function notation is generally preferred, and they’re helpful in case of callback functions (covered later.)
- An arrow function can be used to replace the name of a function. They serve the same purpose as lambdas in Python.
Youc an use an arrow function without the curly braces too. The value will be implicitly returned. For example:
const arr = ['apple', 'orange', 'mango'];
let fruits1 = arr.map(x => {
    return x+'s';
});
console.log(fruits1);
[ 'apples', 'oranges', 'mangos' ]
The above code had curly braces inside the map function and needed an explicit return line. But since it’s only a return statement and doesn’t need a block of code, you can also do this:
const arr = ['apple', 'orange', 'mango'];
let fruits = arr.map(x => x+'s');
console.log(fruits);
[ 'apples', 'oranges', 'mangos' ]
5.6.3. Callback functions
- You can pass a function a as an argument to another function b, and in b you can call a. a is your callback function as b will call a as and when required.
Here’s an example of a function processUserInput() taking a callback function called callback().
function processUserInput(callback) {
    let name = prompt("Enter your name:");
    callback(name);
}

processUserInput(
    (name) => {
        alert("Nice to meet you, " + name + "!");
    } // You either pass the name of the function defined, or you simply pass an arrow function
);
A real world example would be a delay. The setTimeOut() function in JavaScript takes two arguments: a callback function, and a number (time in milliseconds it should wait, after which the callback function is executed)
console.log("Start");

setTimeout(() => {
    console.log("3 seconds later...");
}, 3000);  // 3000 ms = 3 seconds

console.log("End");
5.6.4. Generator
JavaScript generator functions are a special type of function that can pause and resume their execution, allowing them to return multiple values over time. They are defined using the function* syntax and use the yield keyword to return values. For example:
function* myGenerator() {
  console.log("Before yield 1");
  yield 1;
  console.log("After yield 1");
  yield 2;
  console.log("After yield 2");
}

const generator = myGenerator();

console.log(generator.next()); // Output: { value: 1, done: false }
console.log(generator.next()); // Output: { value: 2, done: false }
console.log(generator.next()); // Output: { value: undefined, done: true }
Here’s another example where it takes a parameter:
function* generator(i) {
  yield i;
  yield i + 10;
}

const gen = generator(10);

console.log(gen.next().value);
// Expected output: 10

console.log(gen.next().value);
// Expected output: 20
In the below example, the initialization of count happens only once. In subsequence function calls, the value of count is returned and then incremented.
function* countTracker() {
  let count = 0;
  while (true) {
    yield count++;
  }
}
const count = countTracker();
console.log(count.next().value); // 0
console.log(count.next().value); // 1
5.7. Events
- An event is a signal given by the browser indicating something has happened.
5.7.1. Debounce
Say we have a function for printing the value of a textbox:
<body>
  <input id="search">
  <script>
   const input = document.getElementById("search");
   input.addEventListener("input", () => {
     console.log(input.value);
   });
  </script>
</body>
The issue is that every time the value of the textbox changes, an event is fired and the function executes once.
- Debounce is where you control how often a function executes during rapidly triggered events.
- Essentially, you keep a timer for each event fire, and you run your code only
after that timer.
- Let’s say it’s 2 seconds.
- If they type another character before the 2 seconds get over, the timer is reset, and another setTimeout() is set for 2 seconds.
- It’s only if there’s no change in the value of the textbox for 2 seconds, does the intended code run.
5.7.2. Throttle
5.8. Modules
- Instead of putting all of the JavaScript code into one big file, you can split the code into seperate JavaScript files called modules.
- For JavaScript code to behave as a module (i.e. code which can be imported somewhere else), you should “export” the code.
5.8.1. Exporting
/*     math.js     */

// Exporting a function
export function add(a, b) {
  return a + b;
}

// Exporting a variable
export const pi = 3.14159;
In the above example, the add() function and the variable pi can be imported from other files. Instead of using the word “export” against everything individually, you can export everything all at once in a single line.
/*     mathLol.js     */

function subtract(a, b) {
  return a - b;
}

const e = 2.718;

export { subtract, e };
5.8.2. Importing
/*     script.js    */

import { add, pi } from './math.js';

console.log(add(2, 3));  // Output: 5
console.log(pi);         // Output: 3.14159
5.8.3. Default Export and Import
- In a module, you can have a “default export”. This export is imported by default when you don’t specify what to import from a file.
- You can import this under any name you want.
For example:
/*     math.js     */
export default function add(a, b) {
  return a + b;
}
And in another file:
/*     script.js     */
import sum from './math.js'; // add(), in this file, is sum()
console.log(sum(2, 3)); // 5
- You can only have one default export per file (in this case, it was add()).
5.8.4. CommonJS
In older versions of JavaScript, you’d had to export like this:
// file1.js
const greet = () => {
  console.log('Hello from greet function!');
};

module.exports = greet;
Importing worked like this:
// file2.js
const greet = require('./file1');
greet();
So yes, you can only export and import 1 function. This style is called CommonJS. The python-like import statements are how we do it in modern versions of JavaScript. If we import modules like that, then those modules are called ES Modules.
5.9. NodeJS
The below command creates a new node project. Creating a node project is essentially creating a package.json file.
npm init -y
This file, present in the root directory, contains metadata about the nodeJS project and it's dependencies. The metadata also includes the line where you pick between commonJS and ES modules:
"type": "module",
// for commonJS, it'd be "type": "commonJS",
5.10. Working with Files
The fs module can be imported in both the ways (commonJS way, or the ES module way).
const fs = require("fs");
// import fs from "fs" // this works too

fs.writeFile(
  "javascript14.txt",  // name of file
  "random text",       // text to be inserted
  () => {},            // callback to be executed
);
fs.writeFile overwrites. If you want to append, you’ll have to use fs.appendFile().
fs.appendFile(
    "javascript14.txt",
    "more random text",
    (error,data) => {console.log(data.toString())}
);
To read files you’ll use fs.readFile() to read the file.
fs.readFile(
  "javascript14.txt",                      // name of file
  (error, data) => {                       // callback to read
    console.log(error, data.toString());
  }
);
Now you can use fs with promises. What we’ve seen until now is where the fs module uses callback functions instead of promisese.
import fs from "fs/promises";
// or const fs = require('fs/promises')
let content = await fs.readFile("javascript14.txt");
console.log(content.toString());


console.log("--------------");


await fs.writeFile("javascript14.txt", "\n\nhey waddup");
content = await fs.readFile("javascript14.txt");
console.log(content.toString());


console.log("--------------");


await fs.appendFile("javascript14.txt", "\n\nhey waddup");
content = await fs.readFile("javascript14.txt");
console.log(content.toString());
5.11. Working with Paths
For this, we use the path module:
import path from "path";

let myPath = "/home/praanesh-nair/gitProjects/odin-learning";

console.log(myPath); // prints the variable
console.log(path.extname(myPath)); // prints file extension
console.log(path.basename(myPath)); // prints name of smallest folder/file
console.log(path.dirname(myPath)); // prints full directory
5.12. Objects
- Objects are the equivalents of dictionaries in Python. They’re enclosed in curly braces and are comma separated.
- Objects are a one-liner programming construct which is conventionally written across multiple lines; It’s not really a block of code. (So this means that after the curly braces are closed, it ends with a comma)
5.12.1. Instance Variables
const person = {
    name: "Praanesh",
    age: 20,
    employed: false,
};
You can replace an entire key-value pair, with a variable declared earlier:
const isStrong = true;

let man = {
    name: "Praanesh",
    isStrong, // this replaces isStrong = true,
    // you don't have to do isStrong: iStrong,
};
- You can access key-value pairs of an object in two ways:
The Python Way (like in Dictionaries):
const tagx = document.createElement("p");
document.body.appendChild(tagx);
for(x in man){
    tagx.innerHTML += `${x} : ${man[x]}<br>`; // man.x won't work coz there's no property called x. (x: hello, )
//  tagx.innerHTML += `${x} : ${man["x"]}<br>`; // this also works
}
The Java Way (like in Objects):
const tagy = document.createElement("p");
document.body.appendChild(tagy);
tagy.innerHTML = man.name + "<br> and " + man.isStrong;
5.12.2. Object Destructuring
- You can directly access the object in two ways:
Retrieve all key-value pairs as your own variables:
const person = {
    name: "Praanesh",
    age: 20,
    employed: false,
};

const { myName, myAge, ifImEmployed } = person;
Get the entire object, except for a couple of keys for which you want a different value:
const person = {
    name: "Praanesh",
    age: 20,
    employed: false,
};

const person2 = {...person, name: "Naresh"}
5.12.3. Methods
You can use regular functions like this:
const shape = {
  radius: 10,
  diameter() {
    return this.radius * 2;
  },
};

console.log(shape.diameter()); // Output = 20

/*                                                */
/*    diameter: this.radius*2, is replaced by:    */
/*    diameter(){return this.radius*2;},          */
/*                                                */
You can do the same thing like shown below too:
const shape = {
  radius: 10,
  diameter: function() {
    return this.radius * 2;
  },
};

console.log(shape.diameter()); // Output = 20

/*                                                   */
/*    diameter: this.radius*2, is replaced by:       */
/*    diameter: function(){return this.radius*2;},   */
/*                                                   */
This is the older way of doing it. Without having to use the function keyword, is the newer standard and is preferred.
5.12.4. Object References
let c = { greeting: 'initial for d and c' };
let d = c;

c.greeting = 'changed from c';
console.log(d.greeting);

// Output: changed from c
let d = c, only assigns the object reference, not the entire memory chunk the object occupies. So changing c, would mean changing d too.
If you need a copy of c to be assiged to d, then:
let c = { greeting: "initial for d and c" };
let d = { ...c };

c.greeting = "changed from c";
console.log(d.greeting);

// Output: initial for d and c
5.12.5. Classes
class Praanesh {
  constructor(val) {
    this.val = val;
  }
  hi() { // this is how you make methods
    return `Hey there ${this.val}`;
  }
}

let x = new Praanesh("rijab");
let y = x;
x.val = "Rishab Ramesh Nair";
console.log(y.hi());
5.12.6. Keys and Values as Array
var x = {
  name: "Praanesh",
  age: 20,
};

console.log(Object.keys(x));
console.log(Object.values(x));

// Output:
// [ 'name', 'age' ]
// [ 'Praanesh', 20 ]
5.13. Arrays
Arrays are the exact same thing as Python Lists (of course, you have to use let, const or var too)
const fruits = ['apple', 'mango', 'orange'];
5.13.1. Extending Arrays
const fruits = ['apple', 'mango', 'orange'];
const food = [...fruits, 'burritos', 'crips']

const element = document.createelement("div");
document.body.appendchild(element);
element.innerhtml = food;
Adding two arrays (the Python) is performed as String Concatenation (So the final result is a String too).
let anotherElement = document.createElement("div");
document.body.appendChild(anotherElement);
anotherElement.innerHTML = food + ['bajji', 'pakoda']; // now, food becomes a String, because this is String concatenation
anotherElement.innerHTML += "<br>" + typeof (food + ['bajji', 'pakoda']);
5.13.2. map()
- The return value of map() is an array.
- It takes an arrow function as a parameter.
- map() passes each element of the array as a parameter to this arrow function and runs it.
- The value returned by this arrow function, is put in the array that map() will return at the end.
const fruits = ['apple', 'mango', 'orange'];
let food = [...fruits, 'burrito', 'crip']


food = food.map(
    (x) => {             // parameter is replaced by each and every element
        return x + "s";
    }
);

const plural = document.createElement("div");
document.body.appendChild(plural);
plural.innerHTML = "plurals = " + food;
5.13.3. filter()
- The return value of filter() is an array.
- It takes an arrow function as a parameter.
- filter() passes each element of the array as a parameter to this arrow function and runs it.
- The final array will contain the element x only if the return value of the arrow function is true.
let names = ['ram', 'shyam', 'ramesh', 'suresh', 'ram', 'ram', 'himesh']
names = names.filter(
    (x) => {
        return x!=='ram';
    }
);
const haha = document.createElement("div");
document.body.appendChild(haha);
haha.innerHTML = names;
5.13.4. Sort
Sort works only for strings. For integers, you’d have to do:
array.sort((a, b) => {
  return something;
});
The return value is:
| Return value | Meaning |
|---|---|
| negative | `a` comes before `b` |
| positive | `b` comes before `a` |
| `0` | doesn’t matter / keep their relative order |
| Return value | Meaning |
For example:
const elements = [
  { id: "headline", priority: 1 },
  { id: "cta", priority: 2 },
  { id: "logo", priority: 3 },
];

const sorted = [...elements].sort(
  (a, b) => a.priority - b.priority
);
| a | b | a - b | result |
|---|---|---|---|
| 1 | 3 | -2 | a before b |
| 3 | 1 | 2 | b before a |
| 2 | 2 | 0 | same |
.sort()works on the original array so you’ll have to make a copy.
5.13.5. Destructuring
const arr = [1, 2, 3];
const [a, b, c] = arr;  // a = 1, b = 2, c = 3
5.13.6. Common Array Methods
var a = [];
for (var i = 0; i < 5; i++) a.push(i);
console.log(a); // [0, 1, 2, 3, 4]

a.shift();
console.log(a); // [1, 2, 3, 4]

a.unshift("banana");
console.log(a); // [ 'banana', 1, 2, 3, 4 ]

a.push("at-end");
console.log(a); // [ 'banana', 1, 2, 3, 4, 'at-end' ]

console.log(a.pop()); // at-end
5.14. Strings
5.14.1. Substring
var s = "Connie Client";
var fName = s.substring(0, s.indexOf(" ")); // "Connie"
//          s.substring(startIncluded, endExcluded);
var len = s.length;                         // 13
var s2 = 'Melvin Merchant';
5.14.2. charAt
var s = "Connie Client";
console.log(s.charAt(4));        // Output: i
console.log(typeof s.charAt(4)); // Output: string
console.log(s.length);
- There is no
chardatatype. It’s a 1-characterstring. In Java,
length()is a method for strings, and a property for arrays.String s = "abcdef"; System.out.println(s.length()); // Output: 6
However in JavaScript for both strings and arrays, it’s a property.
5.14.3. Palindrome Checker
- We
split("")the string into an array of characters. - Then we
reverse()the array. Then we
join("")it back.function isPalindrome(str) { let reversed = str.split("").reverse().join(""); return str === reversed; } console.log(isPalindrome("madam")); // true console.log(isPalindrome("hello")); // false
5.15. Asynchronous JavaScript
Generally in single-threaded models there are two types of programming languages: Synchronous and Asynchronous
- Synchronous programming languages are sequential; instructions are executed one after the other and only on completion of one statement, is the next statement executed. This model isn’t suitable for languages like JavaScript as it’d freeze the entire page because of some demanding instruction.
- JavaScript is an asynchronous programming language. It just kicks off instructions, and then moves on to the next line.
5.15.1. Promise
A Promise is a class you can invoke in JavaScript. It’s an object that represents a value that isn’t available as of now. It promises to be available in the future 🙂 . It’s a placeholder for the final result.
const users = fetch("https://fake-json-api.mock.beeceptor.com/users");
console.log(users);
You get this as output:
Promise { <pending> }- A Promise is initialized with an arrow function, which takes in two callback functions as arguments: resolve and reject.
- Resolve is called when something is true and reject is called when something isn’t right.
Every Promise consists of three methods: then(), catch() and finally(). then() is called when the Promise is resolved and .catch() is called when Promise is rejected.
let myPromise = new Promise((resolve, reject) => {
  setTimeout(() => {
    const success = true;
    if (success) {
      resolve("Operation successful");
    } else {
      reject("Operation failed");
    }
  }, 1000);
});
You can call the .then(), .catch() or finally() method as myPromise.then(), myPromise.catch() or myPromise.finally().
When you fetch data it already returns a promise for you:
const users = fetch("https://fake-json-api.mock.beeceptor.com/users");

users
  .then((response) => response.json()) // convert the response to JSON
  .then((data) => {console.log(data);})
  .catch(() => {console.log("No data found");});
First you call then() from users, then you’re calling then() from users.then(). After that, you’re calling catch() from users.then().then() . You can chain these methods as each method returns another Promise.
- One thing to note is that if you don’t initialize the Promise with the arrow function taking resolve and reject as callbacks, it means it’s in its default state “Pending”. Any Promise is Pending, Resolved or Rejected, and if you don’t pass the last two, it remains in its default state. This explains the output earlier.
- So generally, when you initialize a Promise, you put in asynchronous code (like a network request, or reading from a file, etc).
To sum up, you retrieve data using a Promise like this:
fetch(url)
  .then(res => res.json())
  .then(data => console.log(data))
  .catch(err => console.error(err));
5.15.2. Async and Await
An async function is a function that always returns a Promise, even if you return a normal value.
async function greet() {
  return "Hello";
}

greet().then(msg => console.log(msg)); // Hello
- The await keyword is used to tell the JavaScript Engine (will be covered later) to pause at that line, until the Promise is resolved. You use await before anything that returns a Promise.
- await is used inside async functions. The concept is simple: If a Promise is being resolved inside a function, that function must return a Promise too. Only then would that function wait for the inner-Promise resolution.
Here’s an example:
async function getUsers() {
  try {
    const response = await fetch("https://fake-json-api.mock.beeceptor.com/users");
    const data = await response.json();
    console.log(data);
  } catch (error) {
    console.log("No data found");
  }
}
getUsers();
This invokes a much more readable form of code and you have a much more conventional try-catch block.
5.15.3. JavaScript Runtime Explained
The runtime consists of all the components needed to run JavaScript code.
- JavaScript Engine
- The JavaScript Engine consists of two components: the Call Stack and the Heap
- The Call Stack is where the code gets executed. JavaScript used to be a purely interpreted language, but now it uses Just-In-Time Compilation (JIT). It is essentially compiling (converting all of the code into machine language), but you don’t get any portable machine-language file you can execute later: it runs instantly.
- The Heap is where the objects are stored.
- When JavaScript code enters the JavaScript Engine, it’s parsed into a data structure called Abstract Syntax Tree (AST). AST Code is now compiled into machine language. Soon after, this machine language is executed in the call stack. So a line is pushed, executed, and then popped from the stack.
- Some Common JavaScript Engines are V8 (Chrome uses this, and so does Node.js), SpiderMonkey (Firefox uses this).
- The JavaScript Engine consists of two components: the Call Stack and the Heap
- Web APIs
- These are interfaces to control various features of the browser. For Example:
- Timers API provides methods like setTimeOut() to create a delay, setInterval() to repeatedly run something.
- fetch API, providing fetch(), enables fetching resources
- console API provides methods like console.log(), for logging output
- Geolocation API for location
- Web Storage API provides sessionStorage and localStorage properties for storing data in the browser, in the form of key-value pairs. Each of these properties contain methods setItem(key, value), getItem(key) and removeItem(key).
- File API for, well, files.
- Performance API for performance stats
- HTML DOM API for accessing elements
- URL API for dealing with URLS
- These are interfaces to control various features of the browser. For Example:
- Callback/ Task Queue
- After an asynchronous operation (like setTimeOut()) finishes, the callback function is placed over here. This is a queue of functions which wait till the call stack is empty.
- The delay you give in setTimeOut() is the time it waits till it can get into the Task Queue, not the time till it waits till it can get into the Call Stack. So they delay you specify, might actually not be the delay for execution. The time taken for the function to go from the Task Queue to the Call Stack is variable as it depends on how many items are there in the call stack.
Here’s an example to how setTimeOut() going into the Task Queue can change code:
for (var i = 0; i < 3; i++) {
  setTimeout(() => console.log(i), 1);
} // output: 3 3 3
On every iteration of the loop, the value of i keeps increasing and the console.log() statements are enqueued on to the Task Queue. Once i becomes 3, the loop is popped off the call stack. Now, the 3 console.log(i) statements are pushed to the call stack. i is a global variable and it’s value is 3. If i was declared as let, things would be different:
for (let i = 0; i < 3; i++) {
  setTimeout(() => console.log(i), 1);
} // output: 0 1 2
There are a couple of definitions you’ll need to know:
- The lexical environment is a data structure that stores variable-value pairs. Every new scope, makes a new lexical environment.
- A Closure is a function that remembers variables from the scope it was created, even if that scope doesn’t exist anymore.
- When you use var, there is only 1 version of that i, and hence only 1 lexical environment created. So all the console.log() statements are closures refering to the same i.
- When you use let/const, the value of i is limited to that scope, and a new lexical environment is created in every iteration (only then will it remember i throughout the entire function). So each console.log() statement refers to the ’i’ of the lexical environment, corresponding to that particular iteration.
- Microtask Queue
- This is a special Queue dedicated to .then(), .catch(), and .finally() callbacks (these are called Microtasks).
- .then(), .catch() and .finally() methods are methods called on a Promise, and their return value is also a Promise. So a microtask can call another microtask independently.
- Event Loop
- The Event Loop is a loop (for, while, whatever it is internally) that continuously checks if the call stack is empty. If it is empty, it dequeues elements from the Task/Microtask Queue and pushes them onto the call stack. This is very crucial to handle JavaScript being Single-Threaded.
- The Event Loop prioritizes the Microtask Queue. It begins to dequeue only after the Microtask Queue is empty.
- This can also mean an infinite loop, as a microtask can call another microtask indefinitely.
6. TypeScript
6.1. Brief Introduction to how Types work
TypeScript is just JavaScript but with data types:
let width = 320;
TypeScript implies that this is a number and now you can only assign a number to it.
You can implicitly assign a type:
let width: number = 320;
6.1.1. Union Types
let id: number | string;
6.1.2. Any
let value: any = 10;
This means you can do:
value = 10;
value = "hello";
value = true;
value = { x: 10 };
6.2. How to run TypeScript
- Basically, you have to turn strip types off of the TypeScript code to turn it into JavaScript, and then use node to run the JavaScript file.
6.2.1. The Traditional Way
Install the TypeScript Compiler:
npm install -g typescript
Compile the TypeScript file into JavaScript
tsc filename.ts
Run the generated JavaScript file using node:
node filename.js
6.2.2. Using tsx
- esbuild is a very fast JavaScript/TypeScript build tool that is written in Go.
- tsx (TypeScript Execute) is a CLI tool that executes TypeScript files directly without using precompilation, by using esbuild.
To run files:
npm install -g tsx
tsx filename.ts
You can run a TypeScript file using tsx and automatically restart the process whenever you save changes to that file:
tsx watch filename.ts
- There are older alternatives like ts-node:
npx ts-node filename.ts
6.3. Classes and Objects
class Point {
  x: number;
  y: number;
}
const p = new Point();

p.x = 10;
p.y = 20;
These are JavaScript Objects (but with types), hence they’re TypeScript.
6.3.1. Types
A plain JavaScript Object with assignment then and there itself would look like:
const person = {
    name: "Alice",
    age: 20
};
The same object with its type explictly mentioned in TypeScript:
const person: {
    name: string;
    age: number;
} = {
    name: "Alice",
    age: 20
};
// const variable: TYPE = VALUE;
// person's type = object with name:string and age:number
Instead you can do:
type Person = {
    name: string;
    age: number;
};
// and then the same syntax as in JavaScript
const person: Person = {
    name: "Alice",
    age: 20
};
6.3.2. Interfaces and how they’re different from Types
interface Point {
  x: number;
  y: number;
}
This creates an object type called Point.
const point: Point = {x: 100, y: 200};
Interfaces and types are almost the same thing. It’s just that with types, you can have unions:
type ID = string | number;
On the other hand, interfaces are strictly for describing object shapes.
Here’s another example:
export type ElementRole = "primary" | "hero" | "action";
This means any variable of type ElementRole can have only these values:
let role: ElementRole;

role = "primary";    // ✅
role = "hero";       // ✅
role = "action";     // ✅
role = "header";     // ❌ Error
role = 123;          // ❌ Error
6.3.3. Optional Properties
Both type and interfaces support optional properties:
interface Person {
    name: string;
    age?: number;
}
So you can do this:
const p1: Person = {
    name: "Alice"
};
const p2: Person = {
    name: "Alice",
    age: 20
};
6.3.4. Syntax to be noted in Interfaces and Types
Note that when you declare the type/shape, you use semicolons (commas work here too), but the actual object creation involves commas:
const person: {name: string; age: number} = {
    name: "praanesh",
    age: 21
};

console.log(person);
{ name: 'praanesh', age: 21 }
6.3.5. keyof Operator
keyofoperator takes an object type and produces a union type of its keys (property names).For instance:
type Person = {
    name: string;
    age: number;
};

type PersonKeys = keyof Person;
keyof Personreturns a union type"name" | "age". SoPersonKeyscan be of valuenameorage.
6.3.6. Indexing Types
You can index a type like you’re indexing a dictionary:
type Person = {
    name: string;
    age: number;
};
type nameType = Person["name"];
6.4. Array
6.4.1. Array of Primitives
const names: string[] = ["Alice", "Bob", "Charlie"];
This is one way of declaring the type:
let numbers: number[] = [1, 2, 3];
console.log(numbers)
[ 1, 2, 3 ]
You can also declare the type as:
let numbers: Array<number> = [1, 2, 3];
6.4.2. Array of Objects
interface Point {
    x: number;
    y: number;
}

const points: Point[] = [
    { x: 10, y: 20 },
    { x: 30, y: 40 },
    { x: 50, y: 60 }
];
6.5. Generics
- These are how to make the datatype itself parameterized.
Say we have one function for numbers:
function identity(value: number): number {
    return value;
}
And another function for strings:
function identityString(value: string): string {
    return value;
}
Instead, you can make the datatype parameterized:
function identity<T>(value: T): T {
    return value;
}
So you can call the function as:
identity<number>(10);
But usually TypeScript can infer it too:
identity(10);
identity("hello");
7. ExpressJS
7.1. Networking
A web server is a program that listens for HTTP requests and sends HTTP responses. Here’s a JavaScript program which makes a server using Node.js’s built-in http module.
import http from "http";

const hostname = "127.0.0.1";  // This is the local IP Address (localhost)
const port = 3000;

const server = http.createServer((request, response) => {
  response.statusCode = 200;
  response.setHeader("Content-Type", "text/plain");        // for plain text
//response.setHeader("Content-Type", "text/html");         // for html
//response.setHeader("Content-Type", "application/json");  // for json
  response.end("Hello World\n");  // How you'll end the response i.e. the actual content
});

server.listen(port, hostname, () => {
  console.log(`Server running at http://${hostname}:${port}/`);
});
Status Code Meaning 200 OK (everything is fine) 404 Not Found 500 Server Error 301 Redirect
- A computer can access 3 IPs:
- 127.0.0.1 - This is the loopback IP address also known as local host. Only your own machine can access this.
- 192.168.x.x - This is the IP address of your computer visible to other devices on the network, where \( 0 <= x <= 255 \).
- 0.0.0.0 - This is the wildcard IP address that any computer connected on the network can access. So if you host your server on this IP address, it’s listening on all interfaces possible. For example, if your port number is 3000, and your IP address is 192.168.29.150, the server will provide a response to any device on the network, via the URL http://192.168.29.150:3000/.
Here’s how you’d make the server respond differently to different urls (eg. /about, /info, etc):
import http from "http";

const hostname = "127.0.0.1";
const port = 3000;

const server = http.createServer((request, response) => {
  const url = request.url; // The path part of the URL (like "/", "/about", etc.)

  response.statusCode = 200;
  response.setHeader("Content-Type", "text/plain");

  if (url === "/") {
    response.end("Welcome to the homepage!");
  } else if (url === "/contact") {
    response.end("Contact us at contact@example.com");
  } else {
    response.statusCode = 404;
    response.end("404 Not Found");
  }
});

server.listen(port, hostname, () => {
  console.log(`Server running at http://${hostname}:${port}/`);
});
- One thing to note is that console.log() statements happen in the server, while these response.end() statements happen in the client side.
7.2. What Express.js is
- Express.js is a JavaScript Framework that provides a robust set of features to make web servers. It’s essentially a web framework built on top of Node.js to make backend development easier.
Given below, is a web server of Node.js
import http from "http";

const hostname = "127.0.0.1";
const port = 3000;

const server = http.createServer((request, response) => {
  const url = request.url; // The path part of the URL (like "/", "/about", etc.)
  response.statusCode = 200;
  response.setHeader("Content-Type", "text/html");
  if (request.url === "/") {
    response.end("Welcome to the homepage!");
  }
});

server.listen(port, hostname, () => {
  console.log(`Server running at http://${hostname}:${port}/`);
});
This is the same server written with Express.js
import express from 'express';
const app = express();
const port = 3000;

app.get('/', (req, res) => {
  res.send('Welcome to the homepage!');
});

app.listen(port, '127.0.0.1', () => {
  console.log(`Server running at http://0.0.0.0:${port}/`);
});
7.3. Static Files
To make files of a directory publicly accessible, you’ll have to specify the nama of the directory in a middleware function express.static().
app.use(express.static(".")); // makes all files in current directory accessible
app.use(express.static("public")); // makes all files in 'public' accessible
Middleware functions will be covered later on
7.4. HTTP Requests
7.4.1. GET Requests
- GET Requests are used when the client wants data from the server without making any changes.
To actually make a GET request, make a HTML file and in a script tag, add:
const getRequest = async () => {
  let a = await fetch('/', {method: 'GET'});
//let a = await fetch('/'); // by default, fetch() uses get requests
  let b = await a.text();   // reading the body might take time
                            // hence this is asynchronous too
  console.log(b);
}
getRequest();
And in the web server:
app.use(express.static(".")); // makes all files in current directory accessible
app.get("/", (request, response) => {
  response.send("get request visible on client");  // visible on client's console
  console.log("get request visible on server");    // visible on server's console
});
On accessing the html file as a client, you can get the server’s response.
- Basically, the code in the HTML file (client) sends the GET request. app.listen() listens for any requests on port 3000, and on host name 0.0.0.0 (aka the end point) and app.get() is a route-handler (code that runs when a server receives a GET request).
- The string in response.send() (in the server), is what the client side GET request fetches.
To respond with a HTML file itself:
import path from "path";
import { fileURLToPath } from "url";
app.get("/random", (request, response) => {
  console.log("random on server");
  response.sendFile(
    path.join(path.dirname(fileURLToPath(import.meta.url)), "html10_CSS.html"),
  );
});
To respond with a json:
app.get('/api', (request, response) => {
  console.log('api on server');
  response.json({
    name: 'Praanesh',
    age: 21
  });
});
- One thing to note is that GET requests are the only type of HTTP requests that are cached by the browser.
7.4.2. POST Requests
- POST Requests are used to send data to the server.
- GET Requests have a limit of 8192 bytes (8KB). Moreover, confidential data shouldn’t be entered using requests as the server often logs these requests. We’ve done this too, using console.log(req.params) and console.log(req.query).
- The fetch() API takes 2 arguments:
- The string consisting of the URL
- An object (enclosed in curly braces, comma seperated values) containing other options
- This object contains fields like method (default value is get, but you can specify post too), headers (another object), etc.
Here’s a simple example of POST Request where you add this in the client side:
const postRequest = async () => {
  let a = await fetch('/', {method: 'POST'});
  let b = await a.text(); // reading the body might take time
                          // hence this is asynchronous too
  console.log(b);
}
postRequest();
And in the web server:
app.post("/", (request, response) => {
  response.send("post request visible on client");  // visible on client's console
  console.log("post request visible on server");    // visible on server's console
});
To actually send data using a POST Request, you use:
const postRequest = async () => {
  let a = await fetch('/', {
    method: 'POST',
    headers: {
      'Content-Type': 'application/json'
    },
    body: JSON.stringify({ name: "Praanesh", age: 21 })
  });

  let b = await a.text(); // reading the body might take time
                          // hence this is asynchronous too
  console.log(b);
}
postRequest();
And in the web server:
// Required middleware to parse JSON bodies
app.use(express.json());

app.post("/", (request, response) => {
  console.log(`receieved ${JSON.stringify(request.body)}`);

  response.send(`Hello, ${request.body.name}. You are ${request.body.age} years old.`);
});
7.4.3. PUT, DELETE
- PUT requests are used to replace an entity completely, while delete deletes the entity.
- Firewalls can block put and delete requests at times.
7.4.4. Why these different HTTP methods matter:
| Method | Server Routing Logic | Body Format Expectations | Browser Behavior |
|---|---|---|---|
| GET | Uses URL & query only | No request body | Can be typed in address bar |
| POST | Can send body | JSON/form data supported | Usually triggered by forms |
| PUT | Requires full object | Replaces resource | Used in APIs |
| PATCH | Partial updates | Only a few fields allowed | Rare in forms |
| DELETE | No body or ID only | Expects ID in URL | Used programmatically |
7.5. Variables in URLS
7.5.1. Slug
For the URLS in any sort of request, you can use variables to specify a general format. For instance, consider this get request:
app.get("/blogs/:lol/:hehe", (req, res) => {
  res.send(`welcome to the ${req.params.lol} page and you are reading ${req.params.hehe}.`);
});
Here, lol and hehe are variables, and they are all called slugs.
- A slug is the name of a file/resource which can be used in a URL without any issue. They’re generally unique alphanumeric characters, all in lowercase, and seperated by hyphens.
- You can find all the slugs requested by the browser, in the req.params object.
7.5.2. Query Parameters
You can assign values to variables after a question mark in the URL. The names of these variables requested by the browser can be absolutely anything.
app.get("/blogs/:lol", (req, res) => {
  res.send(`welcome to the ${req.params.lol} page`);
  console.log(req.query);
});
- So if the URL entered was http://localhost:3000/blogs/nanananana?mode=dark&user=guest
- console.log(req.params) would return [Object: null prototype] { lol: ’nanananana’ }
- console.log(req.query) would return [Object: null prototype] { mode: ’dark’, user: ’guest’ }
- While they can be used in any sort of request, they’re commonly most useful for get requests.
7.6. Extras
app.get(), app.post(), app.put(), etc can be chained.
app
  .get("/", (request, response) => {
    response.send("hey");
  })
  .post("/", (request, response) => {
    response.send("imma send you post request");
    console.log("post request visible on server");
  })
  .post("/blog", (request, response) => {
    response.send("imma send you post request FROM BLOG");
    console.log("post request visible on server FROM BLOG");
  });
This is because each of these methods return an instance of the app() object/router.
7.7. Routing
You can split all of these routes (.get(), .post(), etc) into different files. In each of those files, instead of using const app = express(), you use const router = express.Router(). You use router instead of app everywhere.
import express from "express";

const router = express.Router();

router.get("/:x", (req, res) => {
  res.send(`some blog called ${req.params.x}`);
});

export default router;
And in the main server:
import express from "express";

import blog from "./javascript23_router.js";

const app = express();

app.use("/blogs", blog);

app.listen(3000, "0.0.0.0", () => {
  console.log("listening");
});
http://localhost:3000/blogs/hehe will give you ’some blog called hehe’
7.8. Middleware
- In case of method routes (aka. route handlers) like app.get(), app.post(), etc, the ’request’ object arrives, and then the ’response’ object is sent.
- Middleware functions are functions that have access to the request object (req), the response object (res), and the next function in the application’s request-response cycle.
The general format is:
app.use((req, res, next) => {
  // some action
  next();
});
The next() function passes the request object to the next middleware or the next route handler. You don’t need to call the next() function if you have finished sending the response object.
app.use((req, res, next) => {
  res.send('haha lol');
  // no need to call next(). It ends right here.
});
If you don’t send the response object, and you don’t call next(), the request-response cycle will be frozen. You can use this to handle errors.
- You can use middleware against both app (via app.use()) and router (via router.use()).
- There exists builtin middleware which you can use:
- app.use(express.static(someDirectory))
- app.use(express.json()) for parsing received JSON files
7.9. Template Engine
8. React
8.1. What is it
- As we know, JavaScript/TypeScript can create, access or modify nodes from the DOM. But as the UI gets more complicated, directly accessing the DOM every single time can get tedious.
- React is a JavaScript Library for creating single-page User Interfaces. It essentially enables you to make a web page using small and reusable components, without having to worry about what’s happening to the DOM. Components are just different parts of the web page (eg. Navbar, list of items, side panel, buttons, etc.). A React application is a tree of Components, where the root node is the Application itself.
- A companion library called ReactDOM maintains a JavaScript data structure called the virtual DOM. It’s lightweight, and it’s stored in the RAM itself, making modifications faster. Then it compares this virtual DOM to the actual DOM and makes changes as small as possible. This is still better than changing full nodes in the actual DOM. The implementation of ReactDOM is in the file <projectDirectory>/nodemodules/react-dom/client.js, which is automatically made when you make a React Project.
The overall skeletal file structure looks like this:
- index.html is the main website. It calls a script main.tsx.
8.2. Making a React Project
- Package Managers: npm stands for Node Package Manager and it’s used to install JavaScript Packages and Libraries. npx stands for Node Package eXecute, and this allows you to run packages without having to install them locally. It’s like borrowing a package, just for one single installation, and this is used when you’re not going to be running/using whatever you’re installing frequently.
- Build Tool: This is the thing to actually create and deploy the application.
Creating the application is essentially making the directory structure, and
all the files required for the project. There are two ways to make and use a
project in React:
The old React Way (which is not recommended)
npx create-react-app playground # where 'playground' is the name of the project
Using Vite (Pronounced veet, and this is the recommended way to start off):
npm create vite@latest # for the latest version
Once you do this, select “React” from the list of projects available, and select “TypeScript”. For the name of the project I’ve chosen “playground”. If you want to make a project out of the directory you’re in, just give “.”. Alternatively, if you want a specific version:
npm create vite@4.1.0
Assuming you’ve created the project using vite, now install all third party dependencies:
cd playground
npm install # or npm i
and now deploy the project on local host (you can open http://localhost:5173/ on your browser to see your website):
npm run dev
dev is the name of the script in package.json:
...
  "scripts": {
    "dev": "vite",
    ..
  }
dev enables hot reloading, and it adds extra checks and warnings. It keeps recompiling on the fly as you code.
To create the actual production site, you’d use:
npm run build
This bundles everything into optimized files, and performs tree shaking (removing unused code).
And to run the production site you just built, you’d use:
npm run preview
8.3. React Components
- A React Component is essentially a TypeScript-XML module with a function as the file name. Previously classes used to be used instead of functions, but now functions are preferred for simplicity. These functions pretty much return HTML code.
The HTML used in tsx or jsx files must use the keyword className instead of class. This is an example of a component App used in the script (main.tsx) called in the final website.
/*     <projectName>/src/App.tsx    */
const App = () => {
  return (
    <> // This is called a React Fragment, and is used when you're returning
       // multiple elements
      <h1 className="text-xl text-center font-medium text-black dark:text-white">
        {" "}
        Hello world!{" "}
      </h1>
    </>
  );
};

export default App;
A React Component can only return one element. For example, return <h1>hey</h1> is valid. You can return a div too. But if you want to return multiple elements, you’ll have to enclose them in a React Fragment.
- .jsx files or .tsx files essentially contain JavaScript/TypeScript, but you can return HTML content.
Components are accessed as a self-closing tag. The name of the tag is the name of the module.
/*     <projectName>/src/main.tsx    */

import { StrictMode } from "react";
import { createRoot } from "react-dom/client";
import App from "./App.tsx";
import "./index.css";

createRoot(document.getElementById("root")!).render(
  <StrictMode>
    <App />
  </StrictMode>,
);
8.4. More on JavaScript/TypeScript XML
In the middle of HTML content, you can plug some scripting logic enclosed in curly braces. Here’s an example:
const List = () => {
  const users = ["michael", "jordan", "naresh", "rishab"];
  return (
    <div className="flex justify-center items-center text-7xl">
      <ul className="space-y-2">
        {users.map((x) => {
          return (
            <li
              key={x}
              className="hover:text-blue-500 hover:bg-red-500 hover:text-9xl transition-all duration-300"
            >
              {x}
            </li>
          );
        })}
      </ul>
    </div>
  );
};

export default List;
8.5. Props
Say you have a component called Button. While using the <Button /> tag, you can pass arguments to it. For example:
<Button title="Clickbait" description="joke bro" />
These arguments are called props. All arguments are internally just parameters of one object (which we conventionally called ’props’) being passed to the component. This is how the component would look like:
const Button = (props) => {
    return (
        <>
            <h1>{ props.title }</h1>
            <p>{ props.description }</p>
        </>
    );
8.6. States and Hooks
- A state is some information belonging to a component, that can change from time to time. For example, a state can be the number of clicks on a button.
- Hooks are functions that can change or modify states.
Here’s an example:
import React, { useState } from "react";

const HiButton = () => {
  const [count, setCount] = useState(0);
    // useState returns an array [stateVariable, stateUpdater()]
  return (
    <>
      <div className="bg-blue-500 p-4 shadow">
        You have clicked this {count} times
        <button
          className="bg-red-500 p-4 mx-4 text-lg hover:bg-red-600 focus:ring active:scale-95"
          onClick={() => setCount(count + 1)}
        >
          click
        </button>
      </div>
    </>
  );
};

export default HiButton;
What concerns us, is the state {count} and the state updater function setCount(count+1).
- States and hooks might seem like they can be replaced by normal JavaScript Variables and functions, but an important thing to note is that when you update a state, React automatically re-renders the entire component. In the above example, as and when you click button, the line above (You have clicked this {count} times) will change too.
- States help component remember information
8.6.1. useEffect Hook
As quoted by dan abramov:
Hooks apply the React philosophy (explicit data flow and composition) inside a component, rather than just between the components.
- useEffect is a React Hook that runs after mounting a component. It takes two arguments:
- The side effect function. This is some function that you’d want to run after mounting a component i.e. the component doesn’t depend on this piece of code.
An optional dependency array, which controls when the side effect should run.
Dependency array When it runs [] Only once (after the first render — like componentDidMount) [count] On first render and whenever count changes No array Every render When your dependency array is empty, it means that there’s nothing the side effect is dependent on. Hence it runs only when it needs to (soon after the component mounts).
Here’s the basic syntax:
import { useState, useEffect } from "react";

const UseEffectTest = () => {
  const [count, setCount] = useState(0);
  useEffect(
      ()=>{
          // code that will run AFTER component is mounted
      },
      []  // dependency array
  );
};

export default UseEffectTest;
- As soon as the component mounts, the side effect runs twice. This is because of the StrictMode component which encloses all other components in your main.tsx file. Everything contained inside StrictMode will run twice, to identify potential bugs. This is a development only tool, and will run twice only if you use npm run dev or npm start. If you use npm run build (the actual production mode), you’ll never see this double rendering.
You can also make the side effect return an arrow function, which will run after a component is unmounted.
import { useState, useEffect } from "react";

const UseEffectTest = () => {
  const [count, setCount] = useState(0);
  useEffect(
      ()=>{
          // code that will run after component is mounted
          return () => {
              // some code that will run after component is unmounted
          }
      },
      []  // dependency array
  );
};

export default UseEffectTest;
8.6.2. useRef
Consider the below program:
import React, { useEffect, useState } from "react";

const HiButton = () => {
  const [count, setCount] = useState(0);
  let a = 0;
  useEffect(
      ()=>{
          a = a + 1;
          console.log(`a is ${a}`)
      },
      [count]
  );
  return (
    <>
      <div className="bg-blue-500 p-4 shadow">
        You've clicked this {count} times
        <button
          className="bg-red-500 p-4 mx-4 text-lg hover:bg-red-600 focus:ring active:scale-95"
          onClick={() => setCount(count + 1)}
        >
          click
        </button>
      </div>
    </>
  );
};

export default HiButton;
Since ’a’ is being updated, the entire component re-renders. The let a = 0 line runs again too. This means that the value of ’a’ is never persistent throughout the lifecycle of the component. To do this, you can access the value of ’a’ directly from the DOM, and not the virtual DOM using useRef.
import React, { useRef, useEffect, useState } from "react";

const HiButton = () => {
  const [count, setCount] = useState(0);
  const a = useRef(0);
  useEffect(() => {
    a.current = a.current + 1;
    console.log(`a is ${a.current}`);
  }, [count]);
  return (
    <>
      <div className="bg-blue-500 p-4 shadow">
        You've clicked this {count} times
        <button
          className="bg-red-500 p-4 mx-4 text-lg hover:bg-red-600 focus:ring active:scale-95"
          onClick={() => setCount(count + 1)}
        >
          click
        </button>
      </div>
    </>
  );
};

export default HiButton;
- So basically, useRef is a React Hook that lets you reference a value that is not needed for rendering.
8.7. Conditional Rendering
9. Web Graphics
9.1. Coordinates and Vector Space
- Pixels start from the top-left, Y grows downward. This is how Canvas 2D and CSS work.
- In computer graphics, Normalized Device Coordinates (NDC) are used.
- This models the screen as a cartesian plane
- Here the bottom-left-rear point is (-1, -1, -1) and the top-right-front point is (1, 1, 1).
9.2. Canvas 2D
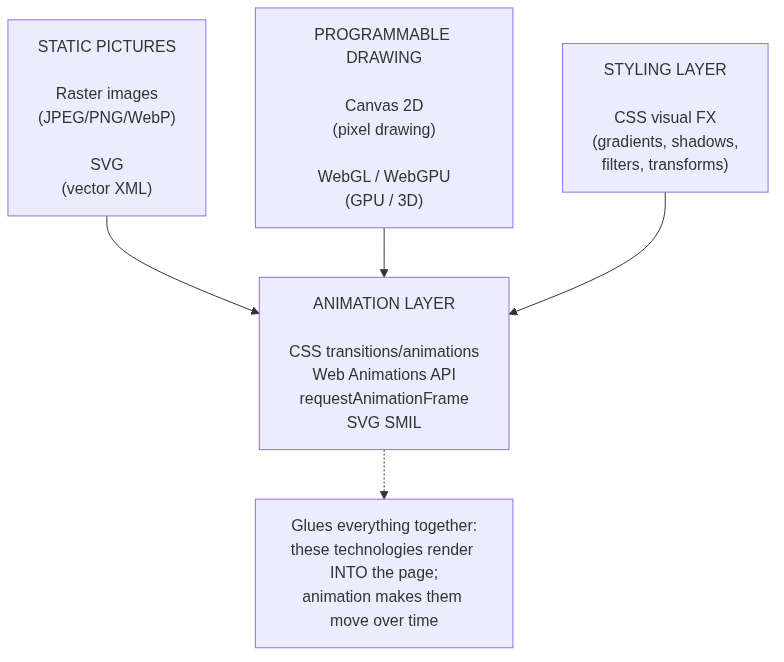
- Canvas 2D is a web feature that lets you draw shapes, text, and images on a web page using JavaScript.
You add a
<canvas>element to the page:<canvas id="c" width="800" height="600"></canvas> <script> const canvas = document.getElementById('c'); const ctx = canvas.getContext('2d'); </script>
- This uses the coordinate system that starts from top-left, and Y growing downward.
For instance:
<body>
  <canvas id="c" width="800" height="600"></canvas>
  <script>
    const canvas = document.getElementById('c');
    const ctx = canvas.getContext('2d');
    // Rectangles
    ctx.fillStyle = '#00aaaa';
    ctx.fillRect(50, 50, 200, 100);     // x, y, w, h
    ctx.strokeStyle = 'black';
    ctx.lineWidth = 4;
    ctx.strokeRect(50, 50, 200, 100);
    // ctx.clearRect(0, 0, canvas.width, canvas.height); // erase
  </script>
</body>
This makes something like:
9.3. WebGL
While Canvas2D is a high-level drawing API, WebGL is a low-level GPU programming API.

9.3.1. Getting Context
WebGL context is the specialized toolkit that connects your JavaScript code directly to the computer’s GPU.
const canvas = document.getElementById('c');
const gl = canvas.getContext('webgl2'); // or 'webgl' for WebGL1
9.3.2. Vertices
- WebGL uses triangles as its core building block because they are always flat, mathematically simple, and fast for graphics hardware to process.
A 3D object is represented using 3 vertices just like a triangle:
const vertices = new Float32Array([
    0.0,  0.5, // x, y for vertex 1
   -0.5, -0.5, // x, y for vertex 2
    0.5, -0.5  // x, y for vertex 3
]);
Note that these coordinates are normalized device coordinates.
9.3.3. Create and Use Buffer
const buffer = gl.createBuffer();
gl.bindBuffer(gl.ARRAY_BUFFER, buffer);
9.3.4. Sending Vertices to GPU
gl.bufferData(
    gl.ARRAY_BUFFER,
    vertices,
    gl.STATIC_DRAW
);
9.3.5. Shader
A shader is a small program that runs on the GPU. The GPU can process many vertices/fragments in parallel.
Vertex Shader Fragment Shader Processes Vertices Processes pixels \[\text{Vertex Data} \;\longrightarrow\; \text{Vertex Shader} \;\longrightarrow\; \text{Triangle Geometry} \;\longrightarrow\; \text{Rasterization} \;\longrightarrow\; \text{Fragments} \;\longrightarrow\; \text{Fragment Shader} \;\longrightarrow\; \text{Pixels} \]
- A shader is written in GLSL (OpenGL Shading Language), and not JavaScript.
- Vertex Shader
attribute vec2 position;

void main() {
    gl_Position = vec4(position, 0.0, 1.0);
}
attribute vec2 positiondeclared input coming from vertex buffer, wherepositionis a variable, andvec2is a datatype (vector of 2 values x and y).gl_Positionis a built-in GLSL variable and the vertex shader must ultimately provide the position of the vertex through it. It’s a vector of 4 variablesx y z w(w is the homogeneous coordinate).
- Fragment Shader
precision mediump float;

void main() {
    gl_FragColor = vec4(1.0, 0.0, 0.0, 1.0);
}
Here
gl_FragColoris a built-in GLSL variable that storesR G B A. - Sourcing the Shader in JavaScript
We store the GLSL code as multiline JavaScript strings (template literals):
const vertexShaderSource = `
    attribute vec2 position;

    void main() {
        gl_Position = vec4(position, 0.0, 1.0);
    }
`;
9.3.6. Full Program
<canvas id="c" width="800" height="600"></canvas>
<script>
const canvas = document.getElementById("c");

const gl = canvas.getContext("webgl");


// --------------------------------------------------
// 1. Vertex data
// --------------------------------------------------

const vertices = new Float32Array([
     0.0,  0.5,
    -0.5, -0.5,
     0.5, -0.5
]);


// --------------------------------------------------
// 2. Create buffer
// --------------------------------------------------

const buffer = gl.createBuffer();

gl.bindBuffer(gl.ARRAY_BUFFER, buffer);

gl.bufferData(
    gl.ARRAY_BUFFER,
    vertices,
    gl.STATIC_DRAW
);


// --------------------------------------------------
// 3. Vertex shader
// --------------------------------------------------

const vertexShaderSource = `
    attribute vec2 position;

    void main() {
        gl_Position = vec4(position, 0.0, 1.0);
    }
`;


// --------------------------------------------------
// 4. Fragment shader
// --------------------------------------------------

const fragmentShaderSource = `
    precision mediump float;

    void main() {
        gl_FragColor = vec4(1.0, 0.0, 0.0, 1.0);
    }
`;


// --------------------------------------------------
// 5. Compile vertex shader
// --------------------------------------------------

const vertexShader = gl.createShader(gl.VERTEX_SHADER);

gl.shaderSource(
    vertexShader,
    vertexShaderSource
);

gl.compileShader(vertexShader);


// --------------------------------------------------
// 6. Compile fragment shader
// --------------------------------------------------

const fragmentShader = gl.createShader(gl.FRAGMENT_SHADER);

gl.shaderSource(
    fragmentShader,
    fragmentShaderSource
);

gl.compileShader(fragmentShader);


// --------------------------------------------------
// 7. Create program
// --------------------------------------------------

const program = gl.createProgram();

gl.attachShader(program, vertexShader);
gl.attachShader(program, fragmentShader);

gl.linkProgram(program);

gl.useProgram(program);


// --------------------------------------------------
// 8. Connect buffer → position attribute
// --------------------------------------------------

const positionLocation =
    gl.getAttribLocation(program, "position");

gl.enableVertexAttribArray(positionLocation);

gl.vertexAttribPointer(
    positionLocation,
    2,
    gl.FLOAT,
    false,
    0,
    0
);


// --------------------------------------------------
// 9. Clear canvas
// --------------------------------------------------

gl.clearColor(0.0, 0.0, 0.0, 1.0);

gl.clear(gl.COLOR_BUFFER_BIT);


// --------------------------------------------------
// 10. Draw triangle
// --------------------------------------------------

gl.drawArrays(
    gl.TRIANGLES,
    0,
    3
);

</script>
And the output looks like