Mobile Application Development
Table of Contents
- 1. Prelude
- 2. Introduction to Android
- 3. How the App works
- 4. Basic Addition
- 5. Intent
- 6. Scroll View
- 7. Spinner
- 8. Feedback app
- 9. Toast
- 10. Personal Expense Manager
- 11. SQLite
- 12. Services
- 13. BroadcastReceiver
- 14. Connecting to the Internet
1. Prelude
- These notes don’t include Android Studio tutorials as:
- Graphical tutorials are a lot of effort
- Android Studio keeps evolving so it’s going to be different when you’re reading this.
- Unlike most of my other notes, these should be used as complementary material. I really don’t think these notes can replace lectures or a course itself.
2. Introduction to Android
2.1. Why Android
Android is a mobile operating system based on the Linux Kernel, designed for touch screen devices. There are several reasons to use it such as:
2.1.1. Large Market Reach
It is used in 80% of the smartphones in the world.
2.1.2. Open Source
All of the code is open to the developers for customization.
2.1.3. Versatility
Android is used in smartphones, smart watches, TVs and cars.
2.1.4. Customizable
Vendors can tailor Android to specific hardware or user needs.
2.2. Sensors that Android Uses
2.2.1. Accelerometer
- Detects device orientation, motion and speed.
2.2.2. Gyroscope
- Measures angular rotation.
- Used in steering in games.
2.2.3. GPS/Location
- Detects the user’s geographic position.
2.2.4. Proximity Sensor
- Detects how close the user’s face is.
- This disables the screen during phone calls.
2.3. Four Components of Android Application Development
2.3.1. Resources
- This contains all static data which is to be separated from the code.
- Includes:
- XML Layouts (stored in
res/layout/) - Strings
- Images
- Colors
- Media Files
- XML Layouts (stored in
2.3.2. Components / Android Stack
- These are the executable of an app.
- These includes:
System Apps OR User Apps |
| Java API Framework |
Native C/C++ Runtime OR Android Runtime (ART) |
| Hardware Abstraction Layer |
| Linux Kernel |
- Every layer in this stack, uses services of the layer below, to serve the layer above.
- The linux kernel is responsible for low-level memory management and security features.
- The kernel talks to the hardware directly, and hardware abstraction layer makes accessing hardware more abstract and standardized.
- Native C/C++ libraries (Android Native Development Kit, or NDK) or Android Runtime (ART), do all the backend work involved in an app. These include managing databases, graphics, web rendering engines, and in basic system functions too.
- The Java API Framework consists of premade classes which correspond to different parts of an app.
2.3.3. Manifest
- A configuration file that the Android Runtime reads first.
- This declares all of the components of the App.
2.3.4. Build Configuration (Gradle)
- Manages dependencies and build settings using the
.gradleconfig files. - It also manages APK (Android Package) versions.
2.4. Navigation
- The back button on the bottom of the screen is called the temporal/back navigation button and that is controlled by the Android System’s back stack.
- The left-arrow on the top-left of the screen is called the ancestral/up navigation button, and it’s provided by the app’s action bar.
- Ancestral navigation is controlled by defining parent-child relationships between activities in the Android manifest.
2.5. Android Application Components
| Component | What it is |
|---|---|
Activity |
A visible screen |
Service |
Background work |
Intent |
A message/request |
BroadcastReceiver |
Listens to system level broadcast messages (like “battery low”) |
ContentProvider |
Data Management |
3. How the App works
3.1. Activity
3.1.1. What it is
- A Java Class that serves as a controller for a specific screen, is called an activity.
- Such a Java Class must
extend Activity(basic activity lifecycle features provided here) orextend AppCompatActivity(this is preferred because modern Android features are backported to older versions too).AppCompatActivityextendsFragmentActivitywhich extendsComponentActivitywhich extendsActivity. - The screen that the app starts with, is controlled with the help of the
MainActivity.javafile.
3.1.2. Activity Life Cycle
- It is a set of states an activity can be in during it’s lifetime, from when it is created until it is destroyed.
- It’s a graph where the nodes are the states, the edges are the callbacks.
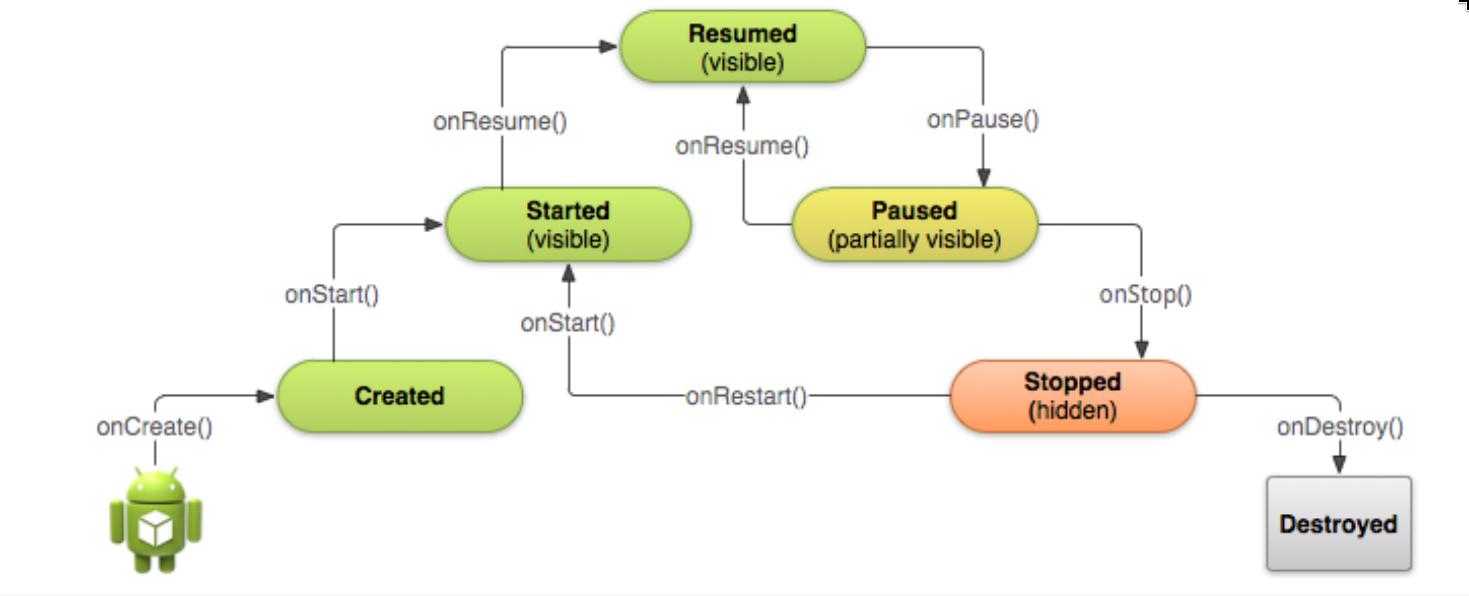
- Created (not visible yet)
- Started (visible)
- Resume (In foreground and interactive)
- Paused(partially invisible)
- Stopped (hidden)
- Destroyed (gone from memory)
3.2. Views
- All of the components of the UI of a particular screen is created using an XML file or a group of XML files.
- Such a component is called a view.
- They’re the building blocks of the user interface.
- Examples of views include
TextView(for displaying text),EditText(for taking text input),RadioButton,Switch,SeekBar(sliders), etc. - Each view will have an
id(an integer), which can be accessed in a Java Class asR.id.nameOfID, whereRis afinal classcreated by Android at build time. An activity is connected to the XML layout because of a line that looks like:
setContentView(R.layout.activity_main);where
activity_main.xmlis the name of the xml file.- Views have properties like:
- Color, dimensions, positions (all static properties)
- May have Focus
- May be interactive
- May be visible or not
- May have relationship with other views.
3.2.1. How it looks like in XML
Let’s arbitrarily take the <TextView/> view and study its properties defined in XML.
<TextView
       android:id="@+id/nameOfID"
       android:layout_width="match_parent"
       android:layout_height="wrap_content"
       android:background="@color/myBackgroundColor"
       android:text="This is some text that will be displayed lolllll"
       android:textColor="@color/#0000aa"
       android:textSize="@dimen/count_text_size"
       android:gravity="center"
       android:textAlignment="center"
       android:textStyle="bold"
       android:autoLink="web"
/>
layout_widthorlayout_height
Value Meaning wrap_contentOnly as tall/wide as the size of the text 100dpFixed width 0dpUsed with layout_weightor ConstraintLayoutmatch_constraintConstraintLayout only dp(density-independent pixels) are used for layout dimensions, whilesp(scale-independent pixels) are used for text-sizes.All of these properties can be modified by changing the XML file, by changing things graphically on Android Studio, or by using the Java code.
android:autoLink="web"
You can make the content inside a
TextViewclickable, by specifying where it should take the user to after clicking.web: Detects URLs like https://example.com or www.example.com and opens them in the browser when tapped.email: Detects email addresses like user@gmail.com and opens the email client (mailto intent) when tapped.phone: Detects phone numbers like +1-800-555-0199 and opens the dialer when tapped.map: Detects addresses and opens them in Maps when tapped. This one is the least reliable — address detection is fuzzy and often misses or false-positives.all: Enables all four of the above at once.
3.2.2. Three ways to define a view
- The three ways to define a view is:
- Graphically
- Through XML
- Programmatically
- A constraint represents connection or alignment to another view.
3.2.3. ViewGroup
- A
ViewGroupis a type of View that can contain other Views. - You can see the View Hierarchy in the component tree.
- Use the smallest number of simplest views
- Keep the view hierarchy flat by limiting nesting of views.
3.2.4. Layout
Layoutis a type ofViewGroupthat are designed to position and arrange those views on the screen.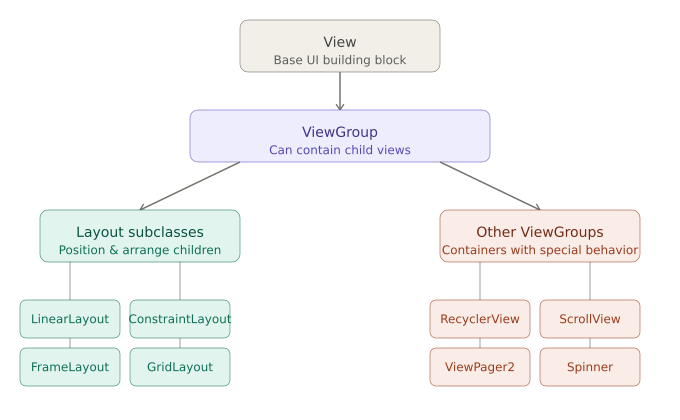
- Creating Layouts using Java
We’ll use
LinearLayout, which just puts items in a row or in a column. To create one and then set the direction, we use:LinearLayout x = new LinearLayout(this); x.setOrientation(LinearLayout.VERTICAL);
Let’s have a
TextViewinside theLinearLayout. To create theTextView:TextView tv = new TextView(this); tv.setText("hi loll"); tv.setWidth(LayoutParams.MATCH_PARENT); tv.setMinLines(3);
To add the
TextViewinside theLinearLayout:x.addView(tv); setContentView(x);To modify properties:
LinearLayout.LayoutParams layoutParams = new Linear.LayoutParams(
                 LayoutParams.MATCH_PARENT, LayoutParams.WRAP_CONTENT
                                                                );
x.setLayoutParams(layoutParams);
4. Basic Addition
- This code follows from this video.
First declare private variables in the
MainActivityclass:private EditText num1, num2; private Button add; private TextView result;
Make sure you do
alt + enterwhen your mouse is over theEditText,ButtonorTextViewdatatype, to resolve all imports.Next, in the end of
onCreate()function, get all of views using their IDsR.id.idName, and then assign them to the private variables you created:num1 = (EditText) findViewById(R.id.no1); num2 = (EditText) findViewById(R.id.no2); result = (TextView) findViewById(R.id.result); add = (Button) findViewById(R.id.addButton);
Before assigning, make sure you appropriately typecast the View.
To the button object
add, use thesetOnClickListener()method asadd.setOnClickListener();. Inside, add a parameter that starts fromnew Viewand just pick the first suggestion (it’s most likely what we need). So the function will look like this:add.setOnClickListener(new View.OnClickListener() { @Override public void onClick(View v) { // here is where we do the logic } });
Use the
setTextmethod on theresultTextView. It can only take a String, so typecast whatever you want to show usingString.valueOf().add.setOnClickListener(new View.OnClickListener() { @Override public void onClick(View v) { result.setText(String.valueOf( Integer.parseInt(num1.getText().toString()) + Integer.parseInt(num2.getText().toString()) )); } });
Just try typing whatever is inside, all you need to do is tab your way through.
The complete app looks like this:
public class MainActivity extends AppCompatActivity {
    // declare these variables
    private EditText num1, num2;
    private Button add;
    private TextView result;

    @Override
    protected void onCreate(Bundle savedInstanceState) {
        // some code already here, just add the below code

        num1 = (EditText) findViewById(R.id.no1);
        num2 = (EditText) findViewById(R.id.no2);
        result = (TextView) findViewById(R.id.result);
        add = (Button) findViewById(R.id.addButton);
        add.setOnClickListener(new View.OnClickListener() {
            @Override
            public void onClick(View v) {
                result.setText(String.valueOf(
                        Integer.parseInt(num1.getText().toString())
                        + Integer.parseInt(num2.getText().toString())
                ));
            }
        });

    }
}
5. Intent
- An Intent is an object used to request an action from another app component via the Android system.
- It’s a message to the Android runtime to run an Activity.
5.1. Types of Intent
- There are two types of intent: Explicit and Implicit
5.1.1. Explicit Intent
- This is the intent used to transfer from one activity to another activity within an application.
- Right click on the
appand create a new activity (Android Studio will automatically create and link the XML file). Trigger the new activity by setting onClick parameter of a button as the name of a function
doSomething(), which is a void function defined inMainActivity.public void doSomething(View view){ Intent intent = new Intent(this, Next.class); intent.putExtra("answer", String.valueOf(Integer.parseInt(someInput.getText().toString()) +100)); // in case you're using data instead of extras (both explained later): // intent.setData(Uri.parse("http://www.google.com")); startActivity(intent); }
where
someInputis the id of anEditTextobject.And in the new activity’s
onCreate()function:Intent intent = getIntent(); textView = (TextView) findViewById(R.id.textView); textView.setText(String.valueOf(intent.getStringExtra("answer")));
5.1.2. Implicit Intent
- This is used to invoke an activity from another app.
Here the system is asked to find an activity that can handle this request.
Uri webpage = Uri.parse("www.google.com");
Intent intent = new Intent(Intent.ACTION_VIEW, webpage);
startActivity(intent);
5.2. Types of Sending data with Intents
| Data | Extras |
|---|---|
| Single piece of information represented by a URI | Key-Value Pairs of Information |
6. Scroll View
- ScrollView makes a single child under it, vertically scrollable. For
horizontal scrolling you’ll have to use
HorizontalScrollView. - When you use scroll view, drag and drop a linear layout into the component tree, and then put whatever you want in there.
- Drag and drop only into the component tree (bottom left corner, basically under palette), because all Views should be under the linear layout.
7. Spinner
Just add Spinner into the XML, and then in the
onCreate()function:List<String> spinnerList = new ArrayList<>(); spinnerList.add("Item 1"); spinnerList.add("Item 2"); spinnerList.add("Item 3"); spinnerList.add("Item 4"); Spinner spinner = findViewById(R.id.spinner); ArrayAdapter<String> adapter = new ArrayAdapter<>(this, android.R.layout.simple_spinner_item, spinnerList); adapter.setDropDownViewResource(android.R.layout.simple_spinner_dropdown_item); spinner.setAdapter(adapter);
8. Feedback app
8.1. RatingBar
You get the rating as:
float rating = ratingBar.getRating();
8.2. Radio Button
Given:
difficulty = findViewById(R.id.difficulty);
then the selected radio button is obtained through the id (int):
int selectedId = difficulty.getCheckedRadioButtonId();
8.3. CheckBox
recommendCheckBox = findViewById(R.id.recommend);
You check if it’s checked or not by the boolean return value:
boolean recommend = recommendCheckBox.isChecked();
8.4. Making a WebSearch Button
Intent intent = new Intent(Intent.ACTION_WEB_SEARCH);
intent.putExtra(SearchManager.QUERY, topic);
startActivity(intent);
The
ACTION_WEB_SEARCHparameter passed to theIntentconstructor is actually a string defined like this:public static final String ACTION_WEB_SEARCH = "android.intent.action.WEB_SEARCH";
8.5. Solving Data Loss after Screen Rotation
8.5.1. What happens when screen rotates
    @Override
    protected void onSaveInstanceState(@NonNull Bundle outState) {
        super.onSaveInstanceState(outState);
        // the below line is what you add
        outState.putString("topic", feedbackTopic.getText().toString());
    }
When you rotate the screen, the state of an activity is destroyed. This is the function that’s called just before the activity is destroyed.
8.5.2. What happens after screen rotates
    @Override
    protected void onRestoreInstanceState(@NonNull Bundle savedInstanceState) {
        super.onRestoreInstanceState(savedInstanceState);
        // the below line is what you add
        feedbackTopic.setText(savedInstanceState.getString("topic"));
    }
This is the function that is called when the activity is recreated after the screen rotates.
9. Toast
Toast.makeText(this, "something to show", Toast.LENGTH_LONG).show();
10. Personal Expense Manager
- Make scroll down/ context menu item
- Make a ’check balance’ option
11. SQLite
11.1. Datatypes
SQLite type |
Use for Notes |
NULL |
Missing values |
INTEGER |
Whole numbers, booleans, Auto-scales bit width |
REAL |
Decimals, floats |
TEXT |
Strings of any length, Most flexible type |
BLOB |
Binary data, but avoid this and store file path as TEXT instead |
Say we have some file DBhelper.java
public class DBhelper extends SQLiteOpenHelper {
    private static final String DB_NAME = "lol";
    private static final int DB_VERSION = 1;
    private static final String TABLE_NAME = "users";
    private static final String COL_ID = "id";        //
    private static final String COL_NAME = "name";    // define column names as variables
    private static final String COL_AGE = "age";      //

    public DBHelper(Context context) {
        super(context, DB_NAME, null, DB_VERSION);    // constructor takes context
    }
    @Override
    public void onCreate(SQLiteDatabase db) {
        String query = "CREATE TABLE " + TABLE_NAME + " (" +
                COL_ID + " INTEGER PRIMARY KEY AUTOINCREMENT, " +
                COL_NAME + " TEXT, " +
                COL_AGE + " INTEGER)";
        db.execSQL(query);
    }
    // the onCreate function builds the sql string:
    // CREATE TABLE users (
    //    id INTEGER PRIMARY KEY AUTOINCREMENT,
    //    name TEXT,
    //    age INTEGER
    // )

    @Override
    public void onUpgrade(SQLiteDatabase db, int oldVersion, int newVersion) {
        db.execSQL("DROP TABLE IF EXISTS " + TABLE_NAME);
        onCreate(db);
    }

}
In the MainActivity.java file,
public class MainActivity extends AppCompatActivity {
    DBHelper dbhelper;
    Button btnSave;
    // ...

    @Override
    protected void onCreate(Bundle savedInstanceState) {
        dbHelper = new DBHelper(this);                          // make new db manager
        btnSave = findViewById(R.id.btnSave);
        btnSave.setOnClickListener(v -> {
            String name = etName.getText().toString();
            String age = etAge.getText().toString();

            if (name.isEmpty() || age.isEmpty()) {
                Toast.makeText(this, "Enter all fields", Toast.LENGTH_SHORT).show();
                return;
            }

            SQLiteDatabase db = dbHelper.getWritableDatabase();  //  opens the db in read-write mode
        //  SQLiteDatabase db = dbHelper.getReadableDatabase();  //  this would open in read only mode, appropriate for fetching data
            ContentValues values = new ContentValues();          //
            values.put(DBHelper.COL_NAME, name);                 //
            values.put(DBHelper.COL_AGE, Integer.parseInt(age)); //
            db.insert(DBHelper.TABLE_NAME, null, values);        //  and here is where the values are inserted into the db

        //  For reading data:

        //  Cursor cursor = db.rawQuery("SELECT * FROM users", null);
        //  StringBuilder data = new StringBuilder();
        //  while (cursor.moveToNext()) {
        //      data.append("Name: ")
        //      .append(cursor.getString(1))
        //      .append(", Age: ")
        //      .append(cursor.getInt(2))
        //      .append("\n\n");
        //  }
        //  cursor.close();
        });
    }
}
12. Services
- A Service is an Android component that runs in the background and has no user interface. It’s designed for long-running operations.
- A Service runs on the main thread.
A Service is started using an Intent:
Intent intent = new Intent(this, MyService.class);
startService(intent);  // starts the service
stopService(intent);         // from outside the service
// OR
stopSelf();                  // from inside the service itself
| Service | AsyncTasks |
|---|---|
| Can run even when the user quits | Short-lived; stops when the background job finishes |
12.1. Started Service
public class MyStartedService extends Service {

    @Override
    public int onStartCommand(Intent intent, int flags, int startId) {
        // This runs every time startService() is called
        // Do your background work here
        // For example: start playing music, begin syncing files, etc.

        new Thread(new Runnable() {
            public void run() {
                // Heavy work on a background thread
                doLongRunningTask();
            }
        }).start();

        return START_STICKY; // tells Android to restart this service if killed
    }

    @Override
    public IBinder onBind(Intent intent) {
        return null; // Started services don't bind
    }
}
If you call startService() 5 times, onStartCommand() runs 5 times, but
onCreate() only runs once (the first time).
12.2. Bound Service
- This works on a Client-Server Model.
- A Bound Service works on a client-server model. Other components (like an Activity) can “bind” to it, send it requests, and get results back. It’s interactive.
// In the Service
public class MyBoundService extends Service {

    private final IBinder binder = new LocalBinder();

    public class LocalBinder extends Binder {
        MyBoundService getService() {
            return MyBoundService.this; // returns the service instance to the client
        }
    }

    @Override
    public IBinder onBind(Intent intent) {
        return binder; // client receives this to communicate
    }

    public String doSomething() {
        return "Result from service";
    }
}

// In the Activity (client side)
MyBoundService myService;
boolean isBound = false;

ServiceConnection connection = new ServiceConnection() {
    @Override
    public void onServiceConnected(ComponentName name, IBinder service) {
        MyBoundService.LocalBinder binder = (MyBoundService.LocalBinder) service;
        myService = binder.getService(); // now we have a reference to the service
        isBound = true;
    }

    @Override
    public void onServiceDisconnected(ComponentName name) {
        isBound = false;
    }
};

// Start binding
bindService(new Intent(this, MyBoundService.class), connection, Context.BIND_AUTO_CREATE);

// Later, call a method on the service directly
if (isBound) {
    String result = myService.doSomething();
}
This is used for two way communication.
13. BroadcastReceiver
- A
BroadcastReceiveris a component in your Android app that “listens” for broadcasts and reacts to them. It’s a class that you create by extending Android’sBroadcastReceiverbase class and overriding one method:onReceive(). There are two types:
Static Dynamic Declared inside AndroidManifest.xmlDeclared programmatically Works even when the app is completely closed (not even running in the background) Works only when the app is open or minimized Here’s an example: The receiver:
public class BatteryLowReceiver extends BroadcastReceiver {
    @Override
    public void onReceive(Context context, Intent intent) {
        if (intent.getAction().equals(Intent.ACTION_BATTERY_LOW)) {
            Toast.makeText(context, "Battery is Low", Toast.LENGTH_SHORT).show();
        }
    }
}
In MainActivity:
package com.example.broadcastreceiver_airplanemode;

import androidx.appcompat.app.AppCompatActivity;
import android.content.Intent;
import android.content.IntentFilter;
import android.os.Bundle;

public class MainActivity extends AppCompatActivity {
    BatteryLowReceiver batteryLowReceiver = new BatteryLowReceiver(); // Make receiver object

    @Override
    protected void onCreate(Bundle savedInstanceState) {
        super.onCreate(savedInstanceState);
        setContentView(R.layout.activity_main);
    }

    @Override
    protected void onStart() {
        super.onStart();
        IntentFilter filter = new IntentFilter(Intent.ACTION_BATTERY_LOW); // listen to only these intents
        registerReceiver(batteryLowReceiver, filter);                      // pass receiver object and the filter object
    }

    @Override
    protected void onStop() {
        super.onStop();
        unregisterReceiver(batteryLowReceiver);
    }
}
You can make it listen to custom Intents from within the app too. Instead of
Intent.ACTION_BATTERY_LOW, you’d have
com.packageName.broadcastreceiever.someaction.
sendBroadcast(intent)is asynchronous and random, whilesendOrderedBroadcast(intent, receiverPermission)is synchronous and ordered. InsendOrderedBroadcast(), you can abort byabortBroadcast()and control the order byandroid:priorityin the manifest.
14. Connecting to the Internet
In AndroidManifest.xml:
<!-- Required to make any network request -->
<uses-permission android:name="android.permission.INTERNET" />

<!-- Required to check whether you're currently connected before making a call -->
<uses-permission android:name="android.permission.ACCESS_NETWORK_STATE" />